You can boot Surface Laptop 2 from USB or CD/DVD for a number of reasons. For instance, if you want to tweak your Windows startup settings or boot from password reset disk, this is the best way to do it. However, booting from external disk is not a simple matter of inserting it and starting up your laptop. You need to first configure your Surface Laptop 2 to boot from an external source like a USB or DVD/CD. This article shows you how to configure your device so you can boot from a disk or flash drive that contains bootable media in the form of a disk image such as ISO.
The configuration part is different for various models of Surface devices, but the method to configure Surface Laptop 2 to boot from USB or a disk is fairly simple. Just follow the instructions shown below:
Step 1: If your Surface Laptop 2 is on, shut it down.
Step 2: Press and hold the Volume Up button, and then quickly press and leave the Power button.
Step 3: Keep holding down the Volume Up button until the logo disappears and you see the Surface BIOS or UEFI.
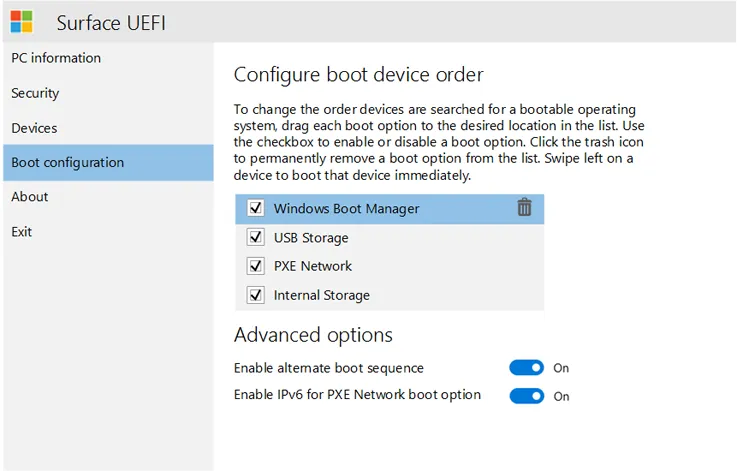
Step 4: Select Boot Configuration, hold down Boot Storage and drag it to the top.
Step 5: Hit Exit, and you're done configuring the Surface Laptop 2 to boot from USB or CD/DVD.
The first thing to do is to make sure that your Surface Laptop 2 is switched off and all USB peripherals are unplugged. That includes keyboard, mouse, storage device or anything else that uses a USB port to interface with your laptop. When ready, carry out the steps described below:
Step 1: Insert the bootable storage medium into your Surface Laptop 2 and turn it on.
Step 2: Press the Volume Down button and keep it depressed while pressing and releasing the Power button.
Step 3: You'll see a Microsoft or Surface logo appear on the screen, and then a bunch of spinning dots will be shown. Release the Volume Down button only after you see them.
Step 4: Instructions will be provided on the screen to boot from the USB or CD/DVD that you inserted.
Step 5: Once that's done, you can carry on with whatever system firmware or startup settings tweaks you intended to perform. Please note that in order to boot Surface Laptop 2 from USB or CD/DVD, the medium needs to contain boot information.
In other words, it needs to be bootable, providing the vital preinstallation environment required for OS-level activities. For example, if you want to reset Windows 10 password and you're using a password recovery software, the password reset disk must contain the bootable information required for the password reset process to work. The system also needs to be prepped to boot from an external device, as shown in the first set of steps outlined here.
If you boot any other way, the system will automatically boot from the OS files already present in the hard drive, and you won't be able to do system-level work on your Surface Laptop 2.
 Posted by Alex Ben
 Related Articles
 Windows 10 Password Reset Tutorial
Can't remember Windows 10 password? Here are 3 ways to reset Windows 10 password.
 Tips to Bypass Windows 7 Login Password
Being locked of Windows computer, how to bypass the password protection easily?
 How to Remove Password from Windows 10
Get tired of inputting password each time, how to remove the password from login screen completely?
 How to Reset Windows 7 Admin Password
The administrator password not working? What is the best solution to reset password from Windows 7?
Copyright 2021 WinPWD Inc. All rights reserved.